Virtual Laboratories
Virtual Laboratories
The virtual laboratory operates within a web page, so you must start by opening a web browser in your computer or tablet. Any modern browser should do, as long as it has JavaScript enabled1,2 (Firefox or Chrome are recommended). If you observe any malfunction, please contact the author providing details about your system and the problem.
Everything is designed trying to provide a realistic experience, within the possibilities of the software. Therefore, there is some information and initial steps, like the catalog or the invoicing, which are part of the procedure even though they are not essential for the experiment.
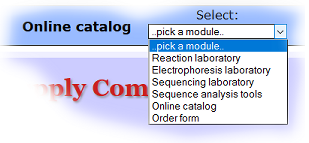
The different sections or modules of the virtual laboratory are accessed via the drow-down menu located at top-right, entitled "Select".
To proceed from the order page to the laboratories you must have some access keys3. Send a request by email indicating your name and position, the name of your teaching centre or institution, town and country, and the intended use (subject, course, number of students); we will reply with a password that will grant access for the applicant and his/her group of students. Each password is linked to the name of the institution, which is also entered in the order form. Passwords need to be renewed every year.
After browsing the catalog you may proceed to the order form, where you should choose:
On the left area there will be the reagents and samples you purchased, a suitable buffer for the particular assay, and water. On the right there are numbered tubes where you can prepare the mixtures to be analysed in the experiment. The blue, unlabeled tube to the left of the waste bin may be used for preparing a previous mix that will then be added to the assay tubes, for example a PCR master mix combining water, buffer and primers.
There is a help panel ("Instructions") that can be unfolded, folded up, moved somewhere else or hidden.
To select the tube you want to act upon, you should click or tap on it (not on the cap); the cap will open and the pipette will move to the tube. Do not try to drag the pipette.
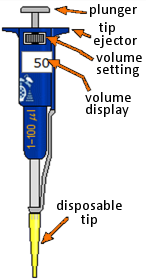
Clicking on the upper part of the plunger makes this move up or down, alternatively aspirating or expelling liquid in the tip. Do not try dragging the plunger up or down.
The pipette has a working range from 1 to 100 μL, in 1 μL steps. The volume to be dispensed is set by clicking on the wheel (left half decreases, right half increases) or typing in the volume display box.
To avoid contamination you should change the tip every time you change samples. The tip is removed by clicking either on the ejector or on the waste bin. A new tip is inserted by clicking on the tip box.
Test tubes on the right area (but also any other empty tube) may be used to prepare reaction mixtures with DNA, enzymes or primers, buffer and water. Note that only numbered tubes in the right area will generate results.
If, due toany error, you need to start anew with clean tubes or replace just some of them, click on the "fresh tubes" container located to the left of the tip box.
After clicking on a tube, pipette, etc., allow some time for things to happen. Do not be impatient.
If, when pressing the pipette plunger, the hand cursor does not disappear move the pointer away from the pipette.
If you want to better see the liquid inside a tube, you can make the pipette leave the tube by clicking again on the tube.
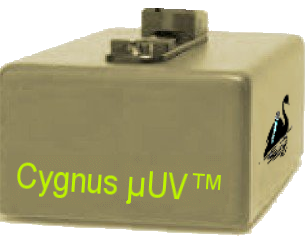 The "µUV" reader allows to measure absorbance at 260 nm of a sample, with the aim of estimating its DNA concentration. The sample prepared in the pipette must be one microliter (and will be discarded after the measurement). Clicking on the reader will open the sample compartment and the pipette will move to it. Once the sample is delivered, the pipette leaves, the lid in the reader is closed and the measurement is performed.
The electrophoresis cuvette (on the left side) may be fitted with either a 2% agarose gel or a 5% polyacrylamide gel; the latter has a lower porosity.
When the "autoload" button is pressed, the cuvette will automatically apply the 12 samples from the test tubes in the reactions laboratory to the 12 wells, plus a size marker DNA into well number 13 (the rightmost well). Samples are automatically mixed with two dyes for checking the loading and the progress:
bromophenol blue and xylene cyanol, as well as a fluorescent intercalating compound similar to ethidium to observe position of the DNA bands.
![]() The switch located in the cuvette controls the ultraviolet lamp (transilluminator). Be aware that to see the emission of fluorescence you must also switch the room lights off (the switch is at top center).
The switch located in the cuvette controls the ultraviolet lamp (transilluminator). Be aware that to see the emission of fluorescence you must also switch the room lights off (the switch is at top center).
This button allows to capture a digital snapshot of the gel, which may be copied or saved to disk using regular features in the browser (usually clicking the right mouse button).
The power source lets you adjust voltage and time, and electrical current is connected and disconnected by pressing the switch.
The two rulers (vertical and horizontal) may be dragged using the mouse; they are just a utility to help in analysis of results.
There are two help panels ("Instructions" and "Size standards") that may be unfolded, folded up, moved somewhere else or hidden.
The electrophoresis cuvette (on the left) uses a single type of polyacrylamide gel.
When the "autoload" button is pressed, the cuvette applies the samples automatically, from the test tubes in the reactions laboratory. Samples are automatically mixed with two dyes in order to check loading and progress: bromophenol blue and xylene cyanol.
The switch located in the cuvette controls the detector of radioactivity (equivalent to autoradiography of the gel) or the detector of fluorescence (laser luminometer). Be aware that to see the emission of fluorescence you must also switch the room lights off (the switch is at top center).
This button allows to capture a digital snapshot of the gel, which may be copied or saved to disk using regular features in the browser (usually clicking the right mouse button).
The power source lets you adjust voltage and time, and electrical current is connected and disconnected by pressing the switch.
The two rulers (vertical and horizontal) may be dragged using the mouse; they are just a utility to help in analysis of results.
There is a help panel ("Instructions") that may be unfolded, folded up, moved somewhere else or hidden.
Some operations and, particularly, the warnings for an error in the procedure generate a sound. Sounds may be globally disabled and enabled by clicking on the icon at top-right, ![]()
![]()
Some internal options in the laboratory may be regulated by choosing an "expertise level" in the drop-down menu located at top right:
 Beginner user
 Both textual and accoustic warnings are displayed when an erroneous procedure is attempted (like trying to pipette without a tip).
Once reactions are finished (enzyme digestion or PCR), a text message is displayed confirming the ingredientes that were added.
Reusing a pipette tip for different tubes does not generate contamination of the mixtures.
 Trained user
No textual warnings will be displayed on erroneous procedures (there will be a warning sound, unless sound has been globally disabled).
No confirmation is offered after reactions.
Reusing a pipette tip in different tubes will result in contamination of the mixtures (a part of the previously pipetted reagent will be carried on to the next tube).
 Expert user
Reusing a pipette tip results in a higher degree of contamination.
Notes:

Author: Angel Herráez , University of Alcalá. Website Biomodel.UAH.es