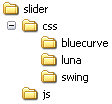
<!--  Uses WebFX "Slider" from  http://webfx.eae.net/dhtml/slider/slider.html
		Author: Erik Arvidsson
		Licensed under the Apache Software License 2.0, http://webfx.eae.net/license/asl2
		This component may be obtained, modified and distributed free of charge for personal
		as well as commercial use. Please see the license for the complete terms and exact wording.
   Integration with Jmol by Angel Herráez.
-->
<script type="text/javascript" src="slider/js/range.js"></script>
<script type="text/javascript" src="slider/js/timer.js"></script>
<script type="text/javascript" src="slider/js/slider.js"></script>
<link type="text/css" rel="StyleSheet" href="slider/css/bluecurve/bluecurve.css" />
<!-- end of Slider -->
and also this:
<script type="text/javascript">
   var defaultSlab = 80;
   function toggleSlab() {
      var ctl = document.getElementById("slabToggle");
      if (ctl.checked) {
         Jmol.scriptWait(myJmol, "spin off; slab on; ");
         slabSlider.setValue(defaultSlab);
         applySlab(defaultSlab);
      } else {
        Jmol.scriptWait(myJmol, "slab off; ");
      }
   }
   function applySlab(x) {
     Jmol.script(myJmol, "slab " + x + ";");
   }
</script>
as well as the code needed to define Info and load JSmol.min.js <div tabIndex="1" class="slider" id="slabSlider" style="width:200px;" >
<input class="slider-input" id="slabSlider-input" name="slabSlider-input" />
</div>
- tabIndex is necessary so that the slider can be moved using the keyboard, although it can have another value to fit your page design.
- class="slider" and class="slider-input" must be left as they are (they are used in the javascript and css included).
- You can change id, name and width values to fit your design, or to include more than one slider. Remember, however, to use matching id and name in the other parts of the page source code described below.
- name is there for supporting old, non-DOM, browsers, but some code for such support has not been included in these examples; if you need it, read the instructions at WebFX original page instead of here.
<script type="text/javascript">
// WebFX "Slider"  code
var slabSlider = new Slider(document.getElementById("slabSlider"), document.getElementById("slabSlider-input"), "horizontal")
slabSlider.setMaximum(100)
slabSlider.setMinimum(0)
slabSlider.setUnitIncrement(2)	// amount to increment the value when using the arrow keys
slabSlider.setValue(defaultSlab)
slabSlider.onchange = function ()
{	// onchange MUST BE all lowercase
	  applySlab( document.getElementById("slabSlider-input").value )
}
window.onResize = function () { slabSlider.recalculate() }
</script>
- "horizontal" may be changed to "vertical". In that case, in the former piece of code you may wish to adjust height rather than width (see source code of examples).